Most chemical fertilizers and pesticides, herbicides & fungicides kill the micro-organisms living in the soil. Many people call 'living soil' the "Web of Life".
Micro-organisms help the roots access the nutrients in the soil. Having these micro-organisms attract other insects which attract ground beetles, birds and frogs. A living soil is rich in life; worms help break down organic material, as do many insects, and create wormholes which increase drainage. Their castings can be measured in the tons per acre! By applying well-composted compost on top of the soil every spring and fall encourages all these life forms to interact and grow. By using chemicals, most of these lifeforms are killed which creates a domino affect throughout the 'web of life'.
Unfortunately, mainly in the last 50 years homeowners have been told to buy numerous amounts of chemicals and fertilizers. Many of the fertilizers leach, quickly past the roots and onto the watertables and out into our lakes and oceans. We were shamed to have nothing less than a lawn that you find on a golfcourse green.
Today, more and more people are ripping up their lawns and replacing them with edible and indigenous plants that have been bred and acclimatized to their region. Starting with these disease-resistant, hardy plants is an important step in creating a healthy garden.
The first step to having a healthy garden is having great healthy soil. This means to add compost at least once a year, in the spring. Green cover crops are grown to ensure no 'bare' spots are left over winter. Green crops can build the soil with nutrients and organic material as well as stop the disease and pest cycles that occur when the same vegetable are grown over and over in the same location.
Rotate your crops! Divide your yard or property into sections and grow similar plant families in each plot. Many of the plants have different nutrition needs, so many people start one plot for the heaviest feeders, that need the most nutritious, high pH soil. Ther lowest quality soil in one of the beds otr location is devoted to plants that are 'light' feeders or plants that can give back to the soil, like the legume family (peas, beans, vetches, broadbeans). Or potatoes or buckwheat can be grown in these poor soil conditions. If growing potatoes make sure the conditions are more acid and do not add lime. Potatoes are a great way to convert a lawn into beautiful soil, ready for whatever your planting scheme is.
I lay down straw (not hay which has seeds) directly over the lawn. I put down a good 3 to 4 inches. Then I cover the straw with 3" of soil and then place the seed potatoes on top of the soil. I then cover the potatoes with another few inches of soil, and then cover the soil with another 4" of straw. As the potatoes begin to poke up through the staw I lightly cover the new growth with more straw. I continue doing this throughout th growing season. In late August, I can start reaching through the straw to pick the amount of potatoes I need. It is important to allow the roots get any light as it will turn the tubers green, which is toxic. Always cut off any 'green' part of a potato before preparing it for food.
In the early fall, I remove all the potatoes and quickly plant winter rye and a winter vetch. In the spring, these plants will take off, so unless you want to leave the soil fallow for another year, I would cut the plants down and gently hoe them into the soil. In a few weeks, plant a new crop, like peas or fava beans. All the grass and weeds will be converted into a beautiful rich organic material, attracting many beneficial insects and worms.
Many of todays organic growers rely on great compost, while others make their own organic fertilizer. This is a very simple and inexpensive way, especially if you buy the 'ingreiants' from a farmer's feed supply company. You will need to buy organic Alfalfa meal, kelp meal, dolomite lime, garden gypsum, and calcium carbonate.
Mix together: 4 parts of alfalfa meal, 1/2 part of dolomite lime, 1/4 part gypsum, 1/4 part calcium carbonate and 1 part of kelp meal. Some people substitute the kelp meal for rock phosphate or use 1/2 part kelp meal with 1/2 part rock phosphate.
Apply 1 cup per 10 sq. ft. Buy your ingrediants in minimum 50 lb. bags. Garden centres will sell an organic mix or these ingrediants in small 5-10 lb bags but the cost will be a lot more expensive.
This post is getting long so I will add one more point before I sign off:
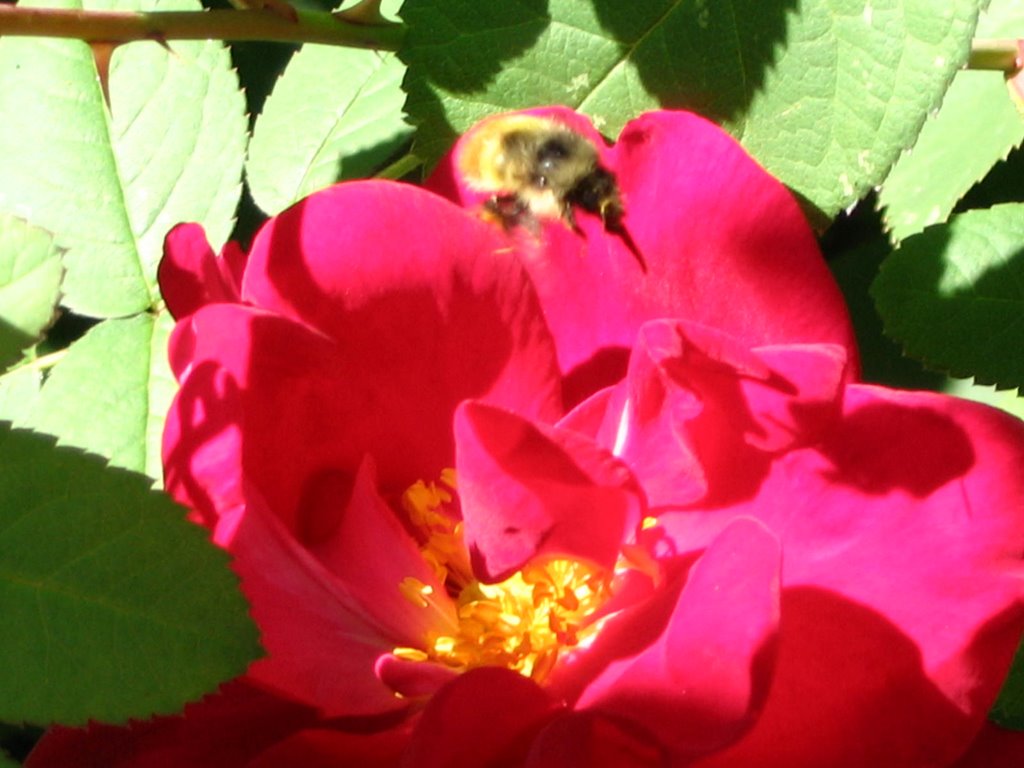
Attract beneficial insects! Plant feverfew, borage, fennel, parsley, shasta daisies, sedums, elderberries; plants that have small flowers. Allow these plants to go to seed too. These plants attract ladybugs and numerous other insects that attack pests.
Have a water source, like a small pond or a dish of water and lay burlap so the insects and bees don't drown. In the Fall, leave some leaves in a pile and hollow dry stems, with rocks, sticks or ornaments that allow these insects to over-winter.
Saturday, April 07, 2007
Wednesday, February 14, 2007
A Walk in the Park.


Yes, even Cityboy Farmers need recreation! Yesterday, I took my two pals out to our neighbourhood park.
Tuesday, February 06, 2007
Compost bins for the masses (And classes).
Everyone with a yard needs a compost pile. When I lived in the city, I would see large bags filled with grasscuttings, sitting on the neighbourhood boulevards, ready for pickup and disposal. If I knew the grasscuttings were not the subjects of chemical experiments (weedkillers, roundup, herbicides and pesticides) I would have eagerly grabbed them in a mad frenzy to 'feed' my compost pile. As I mentioned in my last passage, many people do not have a compost pile because they feel it is too much work. Composting is a very easy pursuit and should be taught to children in schools. I imagine a school program that instructs and teaches by putting their lessons into practice.
Imagine a school that had a course that involved all school grades. This practical course could be broken into disciplines:
- a recycling program, where glass, metal, paper and compostible materials could be sorted and properly distributed and 're-used, and/or recycled.
- a recycling, reuse and reduce instruction and practice; this could be a fund-raiser where students 'sell' their crafts & creations made from materials, typically, destined for the landfill.
- a compost program that introduces the science of composting; the understanding of microorganisms, insects, heat, water and air to promote an efficient and fast conversion of recognizable carbon/nitrogen materials into beautiful and beneficial compost.
- a gardening program that builds a fully-functioning garden that supplies fresh herbs, grains, legumes, vegetables and fruit to the school cafeteria
- a marketing course that allows the students to raise money for various goals and projects from the marketing, PR, packaging, distribution and sale of numerous goods created from the above.
I know I was going to talk about Composting but my enthusiasm to give students and young people meaningful tools, that are directly tied into the school's curriculum and learning objectives, is a subject that's dear to my heart.
Sunday, February 04, 2007
Burning, dumping, oh no!
Our neighbour piles up all his branches and other wood debris and burns them, every Spring.
Every Autumn, numerous homeowners burn large piles of dried leaves.
I watch as billows of smoke drift across our yards, causing pets, children and me to search for clean air.
These same neighbours spend hundreds of dollars on truckloads of compost.
Is there anything peculiar with these events? Is there a better way?
Yes! These people could be producing their own 'free' compost for thier gardens and keeping our air a little cleaner. Most people associate composts with smell or pests or just think it will be too much work. I can be the first to say that on all 3 counts these are incorrect assumptions.
Compost is easy! If you have a yard, then you'll need 2 kinds of composting devices. The first kind is either a commercial, contained one which is designed for vermiculture--the growth of worms--or a larger one to hold larger, yard trimmings, leaves and small branches.
Vermiculture: All children love vermiculture! It can be done indoors in a commercially purchased bin or a large tupperware bin; or outdoors as long as the worms are insulated from the cold. All vermiculture bins need airholes at the top to allow your worms, and micro-organisms to breath.
Begin by soaking newspaper in water, to remove as much ink as possible. Avoid coloured inks and if possible choose unbleached, uninked brown paper bags. I forgot to say to 'shred' the paper first. Take the brown, shredded paper and squeeze out excess water and place it into the bottom of the bin. Then take a few cups of soil, and slightly mix it into the top layer of the paper. Add some soaked peat moss. Avoid using all soil as it will make your bin really heavy and, as worms are litter-dwellers, they prefer wet leaves or paper. The worms need some 'grit' to help their digestion; this is the reason for adding some soil.
OK! Time to add the worms! Most compost demonstration gardens sell 'red worms', or you could find them in an existing leafpile. Now they will need some food, such as: all vegetable & fruit peelings and scraps. Coffee grounds, filters, teabags, oatmeal, hair, bread and eggshells. Avoid adding meats, oils, or cooked salty foods. Cover with a brown paper bag or uninked brown cardboard; this keeps the moisture in and shields the worms from light. Every week or whenever you have scraps add them to the wormbin. Try to dig down a few inches to cover the food. Soon, you will see the food disappear. If the bin begins to smell then you either have too much uneaten food at the top and should try to bury the scraps under a few inches of paper, leaves, or or cardboard material.
In about 4 to 6 months depending how well you cared for your little 'eisenia foetida' friends, you will need to remove 3/4 of the compost and worms. Producers market this rich compost as 'Black Gold'! Your Black gold can now be used as a topdressing around your plants (keep away all dirt from touching the crown or stem of the plant as this may encourage rot, pests or disease) or placed directly onto your vegetable or garden beds. Or you can sell the BlackGold to your unconverted, leaf-burning, landfill abusing neighbours...
Ok! Time for lunch; I will add more info about outdoor composters and bins later...
Friday, February 02, 2007
Choppin' wood!
In an attempt to convert myself from a 'Cityboy' to a full-fledged Country boy, I not only bought a skookum 4.5 HP chainsaw with a 20" bar but I purchased a 'spiral' steel wedge and a 5 lb. maul/axe. The wedge is a brilliant device, with a spiral twist that forces the wood apart as the wedge is pounded deeper into the wood block. It makes me feel rather competent of splitting large wood rounds. My maul is a monster of an axe, and is designed for splitting wood. Until I moved here, I did not know the difference between a chopping axe and a splitting axe.
In the summer time, I began to cut up and collect wood for our fireplace: our main source of heat. In all the previous years, we had run out of wood around January so I was determined to be fully stocked with wood this year. I cut up about 4 or 5 trees; split them and dried them.
To hold 6 months of wood, I converted the previous owner's jungle gym into a storage unit. Slowly, I filled up rows of beautifully dried maple, fir, and alder wood. In November, when the first real rain came, I found that my converted jungle gym leaked, soaking all my wood. So, I moved half of the wood under the open shed. The wind dried the wood, until it snowed and all the wood is now soaked again with the snowdrifts that covered my wood. I guess the good news is that we probably will not run out of wood this year, as the wood does not burn very fast when it is wet.
Monday, January 29, 2007
Nutrition?
There has been so may 'fad' diets, like Atkins, cabbage soup, South Beach, etc...
And many work, especially weight watchers BUT, many of these diets are not sustainable as too few calories are consumed. The body will slow the metabolism while in this 'starvation mode' and will store the calories as fat once a person goes off the diet and people will typically regain (and more) the weight they lost.
I am not a nutritionist but I have worked with nutritionists for over 20 years and am forced to learn a bit of their wisdom (through osmosis!). Atkins diet basically eliminates carbs, although they have a system called 'net carbs'. Net carbs is basically the total carbs minus the amount of fibre. So if an apple has 21 carbs and 2.6 grams of fibre, the net carbs would be 21-2.6= 18.4 net carbs. The problem with Atkins is it forces a person to increase their fat intake.
Recommendations are not consistent but roughly many agree on the following:
approx. 20% of your calories should come from fat.
approx. 15% of your calories should come from protein.
approx. 65% of your calories should come from carbs.
In the 20% fat total, only 7% of your total calories should come from saturated fat.
So, based on a 2,000/day calorie intake: 7% of saturated fat would be 140 calories divided by 9= 15 grams of saturated fat.
There are 9 calories per gram of fat. The other recommendation is to have 30-50 grams of fibre a day. Most people on an Atkins diet would be getting less than 10. The secret to weight control is not to 'diet' but rather to establish a 'healthy lifestyle' with plenty of fresh veggies, fruit. Low levels of saturated fats, zero levels of trans fats. Low sodium and high fibre and close to 2 litres of water a day. Avoid processed foods, especially fast food and processed meats, like sausages and bacon. These foods are very high in sodium and nitrates. Vegetarians need slightly more protein in their diets than non-vegetarians:
non-vegetarians need approx. .4 grams per lb of body weight.
vegetarians need about .5 grams per lb. of body weight.
Buy low fat milk, cheese. Buy whole grains. Buy deep green and deep orange veggies. Buy deep orange fruits and dark blue/purple fruits, like blueberries, blackberries, raspberries and cranberries. Avoid 'fizzy' drinks. Avoid deep fried foods.
Tomatoes, Tomatoes, Tomatoes!
After years of admiring my Father's tomatoes (I hope that doesn't sound too weird!), I decided to double our area for growing the prized, and expensive vegetable. I collected tomato seeds and bought a number of varieties from our local 'Seedy Saturday' event. The name can falsely mislead the uninititiated, believing 'Seedy Saturday' is a rather decrepit affair, and to be avoided. But nothing could be further from the truth! Our 'Event' attracts over 70, primarily organic, suppliers of seeds. Some suppliers only sell seeds for growing vegetables, while others have various grains, flower seeds and even mushroom cultures & mason bees. This year, armed with over $100 of seeds, I began to plan our garden.
In March, I began to place my tomato seeds into little peat containers with rich, sterilized potting soil. After a few weeks, a spindley little tomato sprout begin to emerge. It is important to keep the little guys in a warm area (60-70 f), with plenty of light and never let the soil dry out. After close to 2 months of babying we had about 36 little tomato plants to place outdoors, during the day. At night we bring them back inside, into the comfort of our home. This process is called 'hardening off', which basically 'hardens' them to the real world, outside-- aclimatizing them. Depending on your zone, planting of the tomatoes, after a week of 'hardening off', can begin in the beginning of May until late June. Most people in zone 6-8 wait until May 24th weekend, as asudden cold spell will either kill the sensitive plants, or stunt them. A stunted tomato plant is not a pretty sight!
Tomatoes love sun! But they don't like their leaves to get wet, so we try to construct a plastic roof over them during the spring or late summer/fall. Some varieties are called 'indescriminate' which means they grow....indescriminately! These are the sprawling kind which needs plenty of room, at least 6 feet to its nearest neighbour. Tomato plants, that are not 'indescriminate' need less space, but still need to be at least 3 feet away. This is a very difficult lesson as when the little plants are only around 8" tall, it is very easy to place the plants too close. If the plants are too close than disease can be transmitted between themselves, as touching leaves collect moisture, creating a nice environment for the various tomato diseases. (The other important task is removing 'suckers' from the crooks of the stems. These will grow tomatoes but they tend to weaken the overall plant.)
By July, we were beginning to think that we planted our tomatoes too late as we had few tomatoes and even fewer flowers, and wondered if would get much produce. Were we ever wrong...
Well, we grew bushels of tomatoes. We had tomato salads, greek salads with tomatoes, tomatoes off the vine; we had so many tomatoes that I began to roast them and make sauce. 375 degree (f) for 1 hour or so. I rubbed the tomatoes, first, with olive oil and added whole garlics covered in olive oil for the last 20 minutes. I then simmered the tomatoes, garlic and carmelized onions for 1 hour or so, removing the tomato skins. I then froze the sauce in tupperware containers or ziplock bags. I made one mistake though; I forgot to label everything. I know, you're thinking "why label tomato sauce". This is a good question but I forgot to mention that I made other recipes with the tomato sauce. The other day I was de-thawing a ratatouille (tomato sauce with garlic, roasted eggplant & red peppers), or at least I thought I was de-thawing ratatouille. It turns out it was curried shrimp with tomato sauce. Now, this wouldn't have been a problem but I was planning to use up the goat cheese.
It is late January and we still have over 50 pounds of frozen tomato sauce or tomato-based sauces in our freezer. My wife has begun to take tums...
Sunday, July 02, 2006
Dig, dig, dig. Wrong, wrong, wrong!
Our veggie garden is about 40 feet by 60 feet; a little smaller than the city lot we lived on at our first house. I wish I knew what I know now when I started the garden. I would have been able to reduce my efforts and create a more productive and easier to manage garden. In 2004, I started my veggie garden the way I had always started a garden: remove the lawn; double-dig the exposed area; add compost and bone meal. Wrong, wrong, wrong! (maybe I should say, instead of "wrong", That there is an easier & better way).
Removing the sod, removes valuable organic material, filled with nutrients, worms and beneficial organisms. Plus it is really hard to do. To follow this method takes hours of back-breaking work BUT there is an easier way...a 100% organic method that is easier and gives better results.
There are a few techniques that are not totally organic which I practice far away from my veggie garden. And no, I'm not talking DDT and a battery of chemicals, I'm talking unbleached paper, that is not glossy or inked. Well, Ok, I'll admit it...sometimes I do use inked paper but it is only in my garden beds. How paranoid do we have to be?
I'm not sure? But if we can create beautiful, great tasting food that is not peppered with chemicals, then why not, especially if it is easier. I know, you are probably saying "get on with it, tell us about this EASY method."
Here it is:
1: Don't remove your lawn! Build your garden on top of your lawn. First cover the lawn with a mulch like grass cuttings, dried leaves, peat moss (make sure you wet it first!). Then cover it with fresh organic compost. What you don't have compost?! We'll get to that in another post, but let say that creating beautiful compost is easy and not expensive.
2: Keep the mulch less than 3 to 4" per layer. So, if you lots of grass cuttings, then use it up in over a few layers, alternating with dried leaves, peat moss or coarsely decomposed garden compost.
3: Cover with a few inches of compost soil.
4: Start planting!
5: use un-inked burlap sacks over the seeded area, laying directly on the soil. Keep the burlap wet. Remove the sacks once the seedlings emerge.
6: Mulch thinly covering all the exposed soil other than the seedlings. Keep the mulch an inch or more from the stem (in most cases) just to make sure the mulch rots the tender stem.
And that's it! It's that simple!
Well, well, well!
Well, when we bought a rural house we were made aware that the acreage was "on a well." And that the sellers of the property would add water to the well "on hot dry summers." We were not sure how much water was ordered every summer but after finding out that for $95, a local water company would add 3,000 gallons of 'fresh drinking water' into our well, we felt that was not going to be a cost issue.
We were used to being on city water, which was always available and only "on hot, dry summers" that the City would order homeowners to water their gardens only every other day (3 1/2 hours in the morning until 7:30 and 3 hours in the evening after 9 pm). This meant that someone could water their city garden for at least 6 1/2 hours a day. The average sprinkler will spray around 5 gallons a minute; therefore a 6 1/2 city watering spree translates into A LOT of water (I don't feel like doing the math, but in my head I calculate 3,150 gallons).
Any way, we became aware of our water usage. I bought a small plastic tub to fit into the sink and collected all our dish water and added it to our watering cans outside. We installed a water-wise toilet that used only 1 1/2 gallons per flush and chanted to all guests "If it's Yellow, let it mellow. If it is brown, flush it down." (I still have trouble saying this to my Parents who visit occasionally as it just brings attention to the fact that I have abandoned my career and have gone off into the woods to exist off the land'.)
Sorry for the digression...ANY WAYS, I bought four 75 gallon water barrels that I installed under the shed. I first had to install gutters. Being a City Boy, I called the local 'Gutter installation" company and was given a quote of $400. Now, this price would not have been an issue but having left the city and closed our city office meant to our clients that we had moved away. A very good observation,one in which they would be correct. But I digress, needless to say there was some questioning about whether any business would come to us 'long distance' so income may be reduced (or eliminated!). So, after all these brain configurations I decided that I can save money and install them myself.
At Home Depot gutters were sold in 10 foot lengths. After, loading up on the necessary brackets, downpipes and silicone glue I drove home satisfied that all this cost me $140, therefore saving me $260 if I had it done 'professionally'.
After, many slips of the gutter sections, having to get off my ladder to retrieve the fallen pieces, and using three 10 foot sections (one cut to 9 feet long to fit), I had the gutters and downpipes up. I then waited excitedly for the firsrt rain to see my handiwork and watch as the water went from my downpipe into the water barrels.
Soon one evening, the clouds rolled in and the heavens opened, and rain poured from the sky. I went over to one of the water barrels and was thrilled to see the rain water flowing into the barrel. The rain water was also dripping from every joint of the 10 foot section but it didn't look like too much was falling and with a spring in my step i headed inside.
The next morning I raced outside, wondering how much water had collected. I was immediately disappointed when i saw that both my drainpipes had fallen away from my gutter, allowing the water to fall on the ground, missing my rain barrels.
I headed back to Home Depot and loaded up on silicone glue and mounded more glue over the joints of the 10 foot sections. As well, I bent the downpipes into a smaller shape and forced them back onto the gutter. I won't get into all the gory details but let's just say that I now have buckets, on the ground, under each joint that continues to leak. The down pipes only rarely fall off as I have placed a concrete cinder block between the end of the down pipe and the water barrel. This keeps the downpipe from falling off.
But, the good news is I easily fill up all 4 barrels every major rainstorm. So for most of May, and a few more times in June, July and August I can collect 300 gallons from my barrels to water the garden. I fill up my two 2 1/2 gallon watering cans and handwater my veggie garden and our flower beds.
I sometimes think about, for only $260 more I could have had a professionally looking (and functioning!) gutter and downpipes but I was a CityBoy farmer now and I had to do more around the homestead.
Since buying the place we have not needed to fill up the well and I have stopped collecting the dishwater but still happily collect the rainwater. I estimate that when my barrels are empty I use about 125 gallons of well water, per day, for my garden. I wish I had a bigger cistern to collect the water during the winter months, eliminating my need for the well water for watering the garden.
Chainsaw: episode 2
Well I brought the chainsaw back to the dealer, explaining that I must
have pulled the starter rope off the pulley... He looked at me with disbelief in his eyes, and carried the chainsaw outside. He then pulled the cord and of course it started. I guess you have to pull the starter cord hard. Hard!
When I got home I went back to the chainsaw instruction manual and realized that when the starter cord is pulled the opposite arm pushes down, on the handle, with equal force and 'Voila', the chainsaw starts. I've started it twice now with the same positive result.
Emboldened with my new skill, I felt it was time to fall some trees.
There are 4 trees on the property that are dead and with the numerous wind storms we get here I felt the need to fall them before they blew into the house or greenhouse (or powerline).
Being a wise and thoughtful soul I knew I needed to practice before attempting one of the trees close to the house or powerline, so I picked out a small tree in the back. This tree was about 7" in diameter and about 30-40 feet in height; a small one compared to the dead Maple tree.
The instruction book illustrates the correct method so I started up the chainsaw and went to work....
The first cut is at 45 degrees, at an angle towards the ground, about 1/3 into the tree. This cut is carefully considered as this determines the direction "where the tree will fall." A 45 degree cut on the North side of the tree will eventually make the tree fall to the north, or so the book explained....
The second cut is on the same side as the first cut only parallel to the ground; the cut is made slightly below the first cut and creating a wedge which is dislodged from the north side of tree. If this 'wedge' does not pop out, a sledge hammer is used to hammer it loose.
The last cut is called "the hinge" as it is performed on the south side of the tree, slightly above the 'where the wedge was', and allows the tree to fall North.
Simple!
Right?
Well, after I cut the wedge opening, I began to realize that this 'small tree' was actually big for me! The instruction book warns that the base of the tree can, in some cases. bounce back as the tree falls forward. So I looked over my 'escape route, just in case...
Well I cut the 'hinge' and immediately the tree started falling 'South'. It stopped, closing up the gap created by my hinge or third cut. After, resting awhile I realized that it's Ok if the tree falls to the south and went about cutting above my first attempt. I creating a new wedge on the South side of the tree and hinge on the north. The Tree just stood there.
So I cut a little further into my wedge and my hinge. Still the tree stood unwavering. Then I remembered the book explained that in these cases a wooden wedge is hammered into the hinge-opening, forcing the tree over. So I went and got my wedge and started hammering it with my sledge hammer into the tree. I hammered and hammered.
I stopped when I realized that between the first set of cuts and the second set of cuts that the tree had moved on the stump and now was overhanging. I found a long wood pole and started banging the tree until it slipped off the tree stump. At this point I went and got my camera as it was hard to believe what was happening. The tree had landed beside the stump but was still in a vertical position as the branches from the other tree held it up (mocking me!).
I now got a rope and pulled at the base of the tree until the tree fell; I was a treefaller.
I have learned that I can't control the direction of the tree fall so will now hire a professional tree faller for the large maple tree.
Oh Well!
Chainsaw: episode 1
Last night a very strong wind assaulted the Island. All through my restless attempt at sleep I thought about the 50 foot dead maple blowing over, possibly smashing into our bedroom.
In the morning, bleary eyed, I stumbled around the property to find a tree had blown down onto our fence, breaking in half, and landing partially onto the side of the road. I knew then what I had to do. I needed to get out my weapon of the Green Peace Party - my 4 1/2 horse-powered STIHL Chainsaw.
Learning from previous mistakes, I tried to start my chainsaw by the shop rather than carry it all the way to the back with the possibility of having to carry it back (sheepishly) without being able to start it. So I pulled and pulled that starter cord. And I pulled and pulled. Nothing, not even a little sputter. Exhausted, I went back inside and removed my safety equipment.
After lunch, I put my safety gear back on and with optimism I tried again to start my chainsaw. I pulled and pulled. Finally, I went into my shop and got my 10" handsaw and holding it close to my body (just in case someone saw me with this little Mattel toy-like saw) I walked quickly back to the fallen tree. I began (GOD, is this boring or what!) cutting through the tree. After penetrating the tree bark I stopped so I wouldn't puke from the effort. Not wanting to give up I continued sawing until the tree was in four 8 foot lengths (please don't feel obligated to continue reading this pathetic story of male inaptitude. I'll never know. Delete it now before you become too depressed.)
Any ways, where was I...
Right. I had finished sawing the trees and went back to my shop and got my wagon.
(OK. This is getting ridiculous. Yes, I know; I have a wagon. But it's not just any ordinary wagon. Ok, yes it is green plastic, but I bought it at Lee Valley and it is made for the garden. Before you go mad, delete. DELETE!!!).
So I was a bit embarrassed pulling my wagon close to the road allowing passing motorists in their 350 H.P. pick-ups with their gun-mounts visible in the back, to see me with my little green wagon. Undeterred, I loaded the four logs onto the wagon and began the long journey back to the shop. I had gone about 3 feet when my load rolled onto the ground. I grunted and managed to stack the logs back on. This time I managed to go 5 feet before all the logs rolled off. 'OK, I won't be greedy', I thought. 'I'll bring 2 at a time'. Both logs rolled off my wagon in seconds. So, I left my wagon and lifted one of the logs and began to carry it back to the shop (did I mention, that it was pouring the whole time!). About 2 hours later, I had my logs near the shop, ready to be cut into firelogs when, one day, I get my chainsaw started....
CityBoyFarmer
How can a cityboy survive as a farmer? Can a cityboy, who has spent decades under flourescent tubing in office towers, make a living in the country? A city boy who got water from a water cooler and drank out of little paper dixie cups? A city boy who saw his business lose thousands of dollars when 9/11 occurred and decided to leave the big city and live a simpler life 'on-the-farm'.
Why should should someone read this diary? This diary is for people to learn 'what not to do' and 'what to do' in order to survive in the country. This is a diary for people who want to learn how to farm, organically. How to live without pesticides, and chemicals but still grow healthy vegetables. This is the place to learn how to create a natural 'eco-system' where birds, snakes and beneficial insects thrive.
Subscribe to:
Posts (Atom)